Lots of great things have been happening this week!
Josh left Monday to go to youth camp (M-Fuge) with the youth group. I have been on single parent duty all week (which is totally exhausting!!).
His big 2-9 was Thursday and we are getting a babysitter this weekend so we can go out to dinner alone (which is totally rare!!).
We went to my parents house on Wednesday and had some great time hanging out! Of course we hit up Goodwill and I got some pretty amazing things (2 amazing bags, a candle holder, and a baby rocking chair) all for less than $20!
We came home this afternoon and our wonderful dog sitter had mowed our lawn! Josh got everything else done before he left for youth camp (the church, cemetery, and 2 neighbors yards) but he didn't have time for ours, so it was super sweet for our pet sitter to do that!!
I am still recovering from being away for a few days=messy house, laundry, and pure exhaustion. Hopefully this weekend will be ample time to recover. I'm looking forward to being "mome" as Luke says (home).

Homemade hand soap
I did it! I finally made liquid hand soap! I found the recipe here, and here are the ingredients I used:

Liquid glycerin and my choice of hand soap. Ingles has an AMAZING organic selection of bar soap. I will be going back and trying different soaps!! This one cost $3.99 and smells just like a peppermint!
Next stop: CVS. They didn't have it, but they offered to order it for me. It was going to cost around $8 for 4oz.
I figured as a last resort I would try Rite-Aid. Sure enough they had it! It was in the bandaid aisle and cost around $5 (the most expensive part of this whole recipe!). I also figured I could always find it on Amazon if I had to and with 2 day shipping it wouldn't be a big deal.
Also this picture was taken AFTER I added the glycerin to the recipe- so as you can see this little bottle will last me a good while. I think I used a tablespoon.

Per the recipe, I grated the bar of soap.... (mozzarella cheese anyone??)


off with the old...
While we're on the subject of new change ups, we got a new roof last week!!
We had Lowe's come out to look at our siding (which we will eventually replace- more on that later). They basically said they don't do wood siding anymore and that we would have to go the vinyl route (which we're not interested in). But in passing Josh asked about the roof and we all made the decision that it needed work.
Here is a before. During some windstorms we've had a few shingles blow off (which we tried to patch with matching shingles). Although we did the best we could it still didn't look right. Also there was some warping of the plywood underneath the roof that made a few places weak. I think it was caused from all that snow we had in Jan of 2011. 5 inches of snow sat on the roof for a week... that can't be good for plywood!
 So we were excited about the change!
Since I try to keep it real on here I'm going to talk prices. Just like anything else, we wanted a good deal, but we also wanted quality work. We contemplated opening a Lowe's credit card to get the 5% discount and the 0% financing. BUT we realized that we actually got a better deal with the 10% military discount. (and they wouldn't combine military with the Lowe's deal) We had another offer (through an already opened credit card) of 0% for 13 months. So that 0% combined with 10% off knocked $450 off the price! That $450 off allowed us to upgrade the shingles to the higher end, making it a better roof all around. We spent around $4,500 for everything (materials and labor).
They even brought the dumpster (and cleaned up EVERYTHING!):

So back to the actual work- because of the warping, we knew we needed the experts. Our roof actually only had 1 layer of shingles, so it would have been ideal to just cover it in another layer (which would have been cheaper), but the plywood needed to be fixed. So off with the shingles!

And on with the new!!
 I'm in LOVE. I like a REALLY dark roof (black preferably), but we figured that the lighter we went the more energy we'd save. This was 1 shade lighter than black black- this color is called Weathered wood. Because of saving 10% we were able to upgrade to the architectural shingles which gives it a staggered look and hides any imperfections. Also these babies say they stand up to 110MPH winds! Regular shingles stand up to 60MPH. So since wind had been our issue we figured the higher we went the better. We have no trees (besides 2 small ones in the front by the road) on our lot. All the trees behind our house are actually past the back of our fence, so we really have no defense when it is super windy. Having no trees actually is great for the roof (no leaves, no tree marks, and no threat of a falling tree!). I guess you can't have your cake and eat it too. It does have a lifetime warranty which actually isn't a lifetime, but more like 50 years. Considering our home will be pushing 100 years old at that point it was a pretty great deal!
Here is a quick before and after side by side:
 Since we will be getting new siding ASAP, we also plan to paint it gray. We have started the carport and back (since we'll only get 2 sides of the house replaced). I think the roof color will look even better with a gray house!!
Horray for change!
oh and I had a dumpster diving escapade... I mean everyone does that at 8am on a Saturday morning right?? (at least since it was early I'm hoping no neighbors saw me!)
So when I say they cleaned up everything, I meant EVERYTHING. Including a barely opened pack of shingles. I saw them sitting in the driveway as they finished... and assumed they'd stay right where I saw them. WRONG. They disappeared. It didn't hit me until Saturday morning (and they were suppose to pick up the dumpster Saturday morning) so I jumped out of bed to look in the dumpster. They were right on top, so I hopped in! Josh was already gone cutting lawns, so I had a laughing fit with myself as I tried to climb out. It was thrilling. :) They were a little bent, but nothing the sun didn't flatten out.
 Here's about where I jumped... those things are deep once you get in!
 We also have 2 complete packs leftover that we will be returning for some money back!
 And I got 2 pallets out of the deal!

We had Lowe's come out to look at our siding (which we will eventually replace- more on that later). They basically said they don't do wood siding anymore and that we would have to go the vinyl route (which we're not interested in). But in passing Josh asked about the roof and we all made the decision that it needed work.
Here is a before. During some windstorms we've had a few shingles blow off (which we tried to patch with matching shingles). Although we did the best we could it still didn't look right. Also there was some warping of the plywood underneath the roof that made a few places weak. I think it was caused from all that snow we had in Jan of 2011. 5 inches of snow sat on the roof for a week... that can't be good for plywood!

Since I try to keep it real on here I'm going to talk prices. Just like anything else, we wanted a good deal, but we also wanted quality work. We contemplated opening a Lowe's credit card to get the 5% discount and the 0% financing. BUT we realized that we actually got a better deal with the 10% military discount. (and they wouldn't combine military with the Lowe's deal) We had another offer (through an already opened credit card) of 0% for 13 months. So that 0% combined with 10% off knocked $450 off the price! That $450 off allowed us to upgrade the shingles to the higher end, making it a better roof all around. We spent around $4,500 for everything (materials and labor).
They even brought the dumpster (and cleaned up EVERYTHING!):

So back to the actual work- because of the warping, we knew we needed the experts. Our roof actually only had 1 layer of shingles, so it would have been ideal to just cover it in another layer (which would have been cheaper), but the plywood needed to be fixed. So off with the shingles!

And on with the new!!

Here is a quick before and after side by side:

Horray for change!
oh and I had a dumpster diving escapade... I mean everyone does that at 8am on a Saturday morning right?? (at least since it was early I'm hoping no neighbors saw me!)
So when I say they cleaned up everything, I meant EVERYTHING. Including a barely opened pack of shingles. I saw them sitting in the driveway as they finished... and assumed they'd stay right where I saw them. WRONG. They disappeared. It didn't hit me until Saturday morning (and they were suppose to pick up the dumpster Saturday morning) so I jumped out of bed to look in the dumpster. They were right on top, so I hopped in! Josh was already gone cutting lawns, so I had a laughing fit with myself as I tried to climb out. It was thrilling. :) They were a little bent, but nothing the sun didn't flatten out.


Curtain remix
Let's start at the beginning... of this room. Move in day nearly 4 years ago this coming month (!).
 Wow how far we've come!!
NOTHING is the same as that picture on the right. 4 years later we have different couches, a rug, different coffee table, curtains, a piano, entertainment center/TV: WOW!
SO about the curtains...
I just didn't LOVE them.


NOTHING is the same as that picture on the right. 4 years later we have different couches, a rug, different coffee table, curtains, a piano, entertainment center/TV: WOW!
SO about the curtains...
I just didn't LOVE them.

Excuse the flag chair making it's home in my blue/brown/white living room. It's Luke's look out the window and wave bye bye chair. So it stays....
A few things I didn't like about them:
1. How the curtains laid flat. I love it when curtains look soft and flowy. These just didn't. They are the only privacy for our living room (where we spend most of our time), since we took off the mini blinds the day we moved in. We keep the curtains closed most of the time, which makes it difficult for natural light to come in. Also we don't want too much light because this window faces west and it can get very HOT and bright on summer afternoons.
2. How the curtain rod went through the top of the curtain. It was just blah.
3. How the curtains covered the only air vent in the room.
4. How the curtains dwarfed the window and also dwarfed the room.
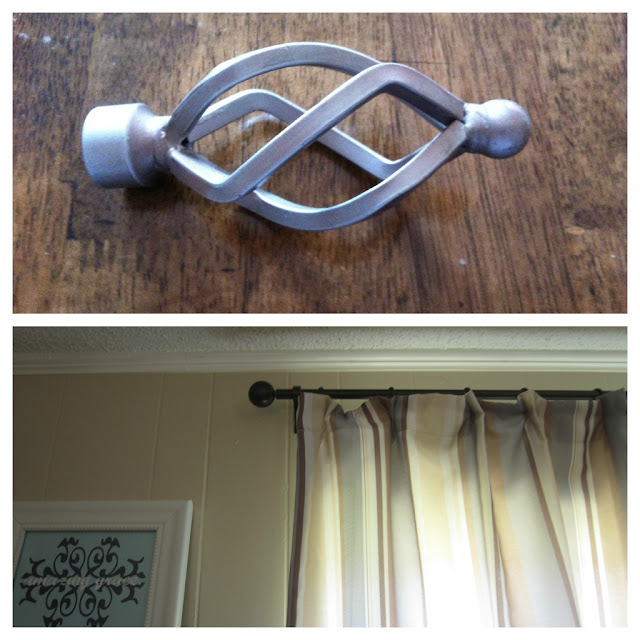
5. The finials just weren't helping the situation.
6. The curtain rods (they were silver) got lost in the room. I wanted them more grounded.
6. The curtain rods (they were silver) got lost in the room. I wanted them more grounded.
Here are the finials before and after:
Here are the curtains before and after:


Here are the curtains before and after:

I added a white panel for softness and privacy while also letting the light in. The white panel is called Vivan from Ikea- at only $10 a pop for 2 panels I couldn't resist. A quick warning... WASH them before hemming them! I cut off ALOT of fabric and was going to hem them (with a 2 inch seam allowance), and after washing I hardly had 1/4 of an inch to work with. They shrunk up quite a bit, but after washing they were also 100x's softer!
The curtain rods got a new coat of Oil-Rubbed Bronze spray paint. The curtain rods are lifted about 6 inches. This makes the window feel bigger and the ceiling taller. It also uncovered the air vent to hopefully keep the room cool in the summer and warm in the winter. The old finials were replaced by round finials (found at IKEA) which match the other curtain rod on the opposite side of the room.
I used curtain clips to attach the curtains to the rod- which add visual interest to the top of the rod. So instead of the rod going through the back/top of the curtain, the rings go through the rod and are clipped on the back of the curtain. This was really the only solution for these curtains since the original curtains and Vivan panels had a different way to attach- it would have looked completely wonky at the top.
Total spent for this spruce up? Right at $30 (including the price of spray paint). The white panels were $10, the curtain clips we $1.99 for 10, and the ORB spray paint was around $7. The finials were $4.99 for a 2 pack. I bought 2 2- packs. Obviously we used the same curtains we already had= free!!

Here's a shot from the other angle of the room. This window was much smaller and it only had 1 original panel. I LOVE the larger colored panel and the smaller white panel because it's a little unexpected (and this picture makes the curtains looks shiny- they really don't look that way!):


And here's the whole room put together!

I LOVE the look of puddled curtains, and these don't exactly "puddle" but with a toddler, dog, and poorly placed AC vent this was the best we could accomplish with what we had!
I am trying to talk my husband into getting a new ceiling fan... I am not loving the lights hanging down, and we use table lamps in there instead. We have to keep a fan in there because our AC is super crazy acting in that room (we don't have enough intakes- therefore this room stays the warmest in the summer, and the coldest in the winter). I would love a sleeker fan with no lights in ORB. Pretty sure Home Depot has some for around $60- we'll see how my sweet talking goes!
Ikea or bust?
We had our first IKEA experience. Love that place. I pretty much knew that I would love it from the website and from blogs that I read that decorate with stuff that is found there. I was REALLY nervous to take Josh... he is slightly OCD and doesn't always enjoy shopping (especially with me). It's something that we are ok with- He is more of a thinker and rationalizes everything. Me? I buy things knowing that I could always return them if I change my mind later. I like to get in and out of stores, and he likes to take his time (and think through everything). So we approach the whole shopping experience differently. I wasn't sure how either of us would react to IKEA so the first trip we agreed not to buy anything. It would just be a "note taking" trip and to just spend some time together.


Needless to say we LOVED IT. I loved how everything is set up (I'm a very visual person who needs to see the whole picture) and you can totally pace yourself. Josh loved how organized everything is (OCD) and the prices. Win-Win.
We made our second trip a couple weeks later. With a $210 budget we took our "wishlist" and narrowed it down so we knew we wouldn't spend more than budgeted. Our main purchase was going to be a coffee table. We have been in the market for MONTHS and haven't been able to find a decent one under $250 that we liked.
IKEA had exactly what we wanted in the color we wanted- white. Anyone ever try to find a white coffee table recently?? They are practically non-existant. Literally. We visited over 6 furniture stores and found 3 total. The first living room set up in IKEA had the one we wanted. Bingo.
We bought the coffee table (for $119- Holler!!), 6 baskets to put in the coffee table ($50), curtain clip ring thingys ($1.99x3), 4 finials to change up my curtain rods ($4.99x2), and 2 white Vivan panels ($10). Total spent? $210 (give or take a few dollars). Oh yeah I also got a can opener.
We rushed home to open the box and set up our new table... only to find it totally cracked/split straight down the middle. Imagine my eagerness totally being blown like a deflated balloon... waaa wahhhhhhh.

Since we live 2 hours away and we took the whole day to go down there, we were really frustrated. We had even opened the box in the parking lot to verify it was the right color... and totally missed this.
We went back the next day (talk about de-ja-vu) to exchange it. We did let them know that we lived so far away and they graciously gave us 2 meal vouchers. Talk about customer service!
Here is the new coffee table in our living room with our new rug (this picture captures the color perfectly!).

I LOVE that we chose white. It adds so much to the space without being overwhelming. I also love how much storage space it has. We filled the front 3 baskets with Luke's toys (books, toys, and trains). The back 3 baskets have books, magazines/newspaper, and Wii remotes.
This picture also gives a sneak peek to our new curtains. I'll talk about them tomorrow!

This picture also gives a sneak peek to our new curtains. I'll talk about them tomorrow!
new rug!
To kick off showing you a little living room change up, let's start with the thing I was desperately wanting. A RUG!


A couple years ago, we got a tan rug with a floral (!??) design. It was cute, added interest, matched the couches, but blended too much with the floor. It was really thin, really cheap, and Luke threw up bananas all over it. I didn't have my rug steam cleaner then (BTW something every mom should have!!) and the stink never went away (disgusting right?). So we trashed it. and waited... (this was 2 years ago).

Next, Josh's dad gave us another rug that fit the space much better, but it was really dark. I was never in love with the design, but it was nice under our feet in the winter. It functioned well, but really wasn't our style. We (with his dad's permission) sold it in our last yard sale... we saw it as sort of a down payment on our new one.

Here's the new one:

{this picture makes it look much darker than it actually is}
I am totally loving this rug. We found it online (Rugs USA- highly recommend by the way!!) for under $200 and it is perfect for the space. It was on backorder and wasn't supposed to be in until the end of June. It arrived the first week. Love little surprises!! It took us FOREVER to choose one that we both liked. Like 3-4 hours on the laptop narrowing it down, finding the cheapest price, etc. We really had to trust customer reviews that the color was different in person. They were right and it is perfect!
And without even realizing it until we unrolled it on the floor, it's my absolute FAVORITE- quatrefoil!!!!!! It looked more distorted on the website picture, but I love it in person 10 times more! I blogged about my slight obsession with quatrefoil here.

Tomorrow I'm posting about our new coffee table, so you'll be able to see how it ties more with the room. Until then, you can take my word that it makes this room 100% better!!
EDIT: I've done a post showing how the rug has held up! Check it out here.
Weekly Update: 6/18-6/23
This has been quite a week. I imagined it being very relaxing- a week where I can finally get some things I needed to get done (like grocery shopping), but I didn't even make it to the store until Thursday!
We made 2 trips to Atlanta (had to go to IKEA twice- I'll post about that next week), picked up my sewing machine, went to the outlets in Commerce, got a new roof Friday, my parents came to visit Saturday, and Luke came down with a fever and ringworm Friday. Phew. This was also Luke's last week of school , and as nice as it is to be able to run errands and do things I need to do, he has totally become my buddy and I miss him when he's at school.
I have already planned a really fun summer for us as we are home. I have a schedule set up that will hopefully keep the boredom away. I have chosen books and art projects that correspond. I have set up times for us to walk at the park, and when we'll watch TV. I am really hoping this will keep us on track, because we both drive each other crazy when we have nothing to do! We are also traveling ALOT in July, so I think it'll keep us on our toes, while not getting too bored with our schedule!
Other exciting things are happening in our lives as well. Things we've been praying about for a loooong time. I am so loving this season of life that we're in!
More Vinyl Lovin'
Here's some more recent projects. I absolutely LOVE my Silhouette! (have I mentioned that recently?) This is what I've been up to since my first post about it.
Monogrammed hair brush:

"Masterpieces" wall:

Extras bin under sink:

Front door number:

Sand Pails:


"Soak" over bathtub:

Mixer:

Headphones:

Teacher gifts:


Plant gift:

Remote Tray:

Mean plan board:

It really is amazing what that little machine will do!!
Monogrammed hair brush:

"Masterpieces" wall:

Extras bin under sink:

Front door number:

Sand Pails:


"Soak" over bathtub:

Mixer:

Headphones:

Teacher gifts:


Remote Tray:

Mean plan board:

It really is amazing what that little machine will do!!
Soda Cozy
I've done a little sewing! I have always thought a cute monogrammed cozy is adorable!


$2.94- are you kidding me??
So, if you've been reading long enough, you know that I can't pass up sharing a good deal. Last time I shared, I hit up Rite-Aid's clearance rack. I always wondered how CVS clearanced their items... and now I have figured it out! Whereas Rite-Aid puts everything in one place, CVS keeps it on the shelf and adds a 25%, 50%, or 75% off sticker to the original price sticker. (At least this is how ours does it- not sure about every CVS).
I did my first trip earlier in the week, and I perused the diaper aisle. I was actually looking for swim diapers, but the 50% off coupon caught my attention on the very bottom rack. They were getting rid of size 5 jean diapers... first off I started a facebook firestorm a couple months back saying how hideous jean and camo diapers are... BUT a deal's a deal and I'm not passing it up!! I bought one pack on that trip at $4.99 because they were only marked to 50% off (I know the picture says $2.99- I'm getting there- it's all part of the story...) :)
After spotting the diapers, I walked through every.aisle. Granted our CVS isn't very big... but still it was pretty exhausting. I jotted down on the back of a receipt things I noticed on sale that we use and I was pretty confident I had coupons for. I went home and began matching my coupons. I don't carry my huge binder in with me to small stores, so going home to figure it out is just part of the game.
Before I break down everything here is the picture with the prices: (when I came back 2 days later, the diapers were marked down to 75% off)!!

Total spent in the picture before coupons? $16.19
How much did I pay?? $2.94!!!!!!!!!!!!!!!!! and I didn't use ANYthing other than manufacturer coupons and 1 CVS coupon.
I used 2 $3 off 2 Pantene coupons (which covered the 3 conditioners and 1 hair gel), 1 $2 off Huggies coupon (which made the diapers 99¢- holy cow!), and 1 50¢ coupon (which doubled to $1) on the toothpaste (more on that later). So those coupons alone knocked $9 off the top.
Plus I had a $5 off $15 dollar purchase (CVS coupon)- so that took off the last few dollars which made the total $2.94 with tax!
Also the toothpaste had an ECB reward which gave me $1.50 back! So I technically only spent $1.44 if you take off the ECB. I was pretty stoked!!
upcycling
I am in love with finding other uses for things. I hate throwing away (even recycling) perfectly good containers. I know everything can't always be used, but I sure do like to figure a way to make it work!
We had the youth over for an end of the year, graduation, and Memorial Day cookout. I decided it would be a perfect time to test out my handy dandy upcycling!
Here's how it worked:
I took an orange juice container-

I used a hair dryer and baby oil to remove the label. Then I applied rubbing alcohol all over the container so the vinyl labels would stick.

After cutting out the labels on my Silhouette, here is the final result (this is the best picture of the vinyl color):


Subscribe to:
Posts
(
Atom
)